4.21.2008

Grilled Cheese Invitational, by Absentee

April is National Grilled Cheese Sandwich Month, you know.


If I could have been lucky enough to participate in the 1st 6th Annual Grilled Cheese Invitational in LA on Sunday, I would have definitely tested these recipes first. In theory, I had two winners. (But I always think that, heh).

There were four categories this year: Missionary Position (make a classic: butter, bread, and Cheddar or American cheese only), Spoons (any flavor butter, bread, and cheese), Kama Sutra (grilled cheese sammie with added ingredients), and Honey Pot (dessert grilled cheese). I chose to enter the Missionary and Honey Pot categories (yeah, in my own little world, okay).

Okay, Missionary. Let's start with English muffin bread. If you haven't tried it (English muffin bread), I implore you. It is something in and of itself. It tastes (kind of) like an English muffin, but more importantly, it toasts like one. Crunchy toasted bread holding in all that butter. Yum! (I even went so far as to bake my own, but that's another story.)

Next, cheese. I love sharp cheddar, all the way. Now, to shred or slice. It has only recently occurred to me that shredding is an option. I grew up eating grilled cheese sandwiches with sliced cheddar; that is how it was done. But, shredded? Some authorities swear by it, but this time I chose to stick with a good old-fashioned slab. (I did slice it pretty thick.) Yes, I will try it the other way some time.

Finally, butter. I am a die hard fan of unsalted butter, especially with good bread, but in this case... I'd have to say, go salty. It adds a savory quality to that crispy grilled cheese crust. This time around I would try a salted Irish butter. This beautiful deep-yellow colored butter had me checking the label for colorant. No silly, it's the cows; they're grass fed, and higher nutrients going in equal higher nutrients coming out. (That's quite a picture.)

The cooking experience itself went as expected. Bubbly butter, browning crust, melting cheese. It looked even better than anticipated. Dark golden buttery goodness as far as the eye could see. But here, the digression. It wasn't nearly as crispy as I would have liked. The bread on the outside had a fabulous crunch, but it didn't carry through the sammie as it should. A real grilled cheese (in my opinion) should have a toothsome wall surrounding an oozy center. This type of bread, while very crispy, is truly only so when it is toasted (implying both sides of the slice), which in this case, it isn't. What's more, as the cheese melted it settled into the nooks and crannies of the bread, further adding to its softness. Don't get me wrong, that part in particular was quite incredible, I just wouldn't call that a classic grilled cheese. I would call it crispy buttery cheesy bread. Back to the drawing board, I suppose.


The next category, dessert: the Honey Pot. Again, English muffin bread, and Irish butter. But I happened to have some Brie on hand, and then there were a few strawberries left over from a recent go at frozen yogurt. Then there was the sugar. I felt the strawberries alone were not sweet enough to turn a grilled Brie sandwich into dessert. So, after I got a wrinkle-nosed response to the suggestion of honey or maple syrup finding their way into the sammie, I decided sugar was the way to go. I would add a bit a sugar to the butter destined for the bread slices. Truth be told, I couldn't resist and I snuck some maple syrup into another bit of butter. I made two versions, both exactly the same, except one with sugar-butter and one with maple syrup-butter, we'll just see which one comes out on top.

Given my response to the bread in my first experiment, one might wonder I would use the very same for my dessert entry. Simple, this cheesy bread-attribute may make it just the thing for dessert. This is not a classic, this is a twist. A little crispy, a little soft and gooey. I like the sound of that.
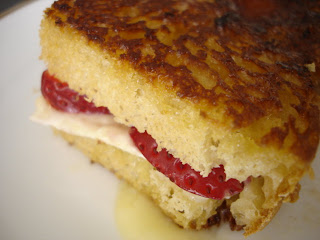


Oh goodness. This is good stuff. I have to say, the maple syrup won me over. The flavor combination just sang, it was quite good. Even a winner, perhaps. The sugared butter provided a caramelized crunch to the bread, which was pleasing but made for very messy cutting (of the finished sandwich, which isn't necessarily necessary, I suppose) and the maple butter sammie stuck to the pan during cooking, which made for messy flipping. But still, delicious. Lick-your-fingers (and the plate)-clean-good.

Out of all of this, I think next time I'll start with different bread, clearly the foundation of a winning grilled cheese sandwich (and you thought it was the cheese). Overall, I would have made for some stiff competition, but with a year between me and the next Grilled Cheese Invitational, it's on.

4.19.2008

Frozen Yogurt for Breakfast

Spring berries are here! And after so many years on this planet I never thought I would utter such words. I always associated berries with summer, and with the modern day conveniences of year-round produce, I have stuck to my guns. But I stand corrected. There at the market were red, ripe, luscious looking berries complete with the imperfections of natures. No sir, no manufactured berries here.


And what goes better with berries than cream? Mmmm, ice cream. Too bad I hadn't thought that through before making it home. No cream, no milk, nada. But I had yogurt.

One quick search for "frozen yogurt" and there it was, the perfect recipe. Only three ingredients: yogurt, sugar, and vanilla. Check, check and check, plus strawberries. The recipe called for a whole milk yogurt, though I happened to have nonfat, but because I had Greek style yogurt, draining was not necessary. Score, I'll go one for two.

I did get a bit impatient, added the strawberries too soon. Because the yogurt was so cold to begin with, it started to freeze so quickly, I thought it was time. The poor little machine strained and struggled to incorporate the berries, but it just couldn't take it. Satisfied with the results nonetheless, I dished out a healthy portion of the frozen treat. (Though in retrospect, I had a very cold bowl of sweetened yogurt with berries. It wouldn't be until later, after some quality time in the freezer. that I actually had frozen yogurt.)


And it was worth the wait. Because I used nonfat yogurt, the texture was a little icy, but I attributed that to having no fat present to smooth it out. I don't mean for that to sound like a complaint. Simply delicious; just the right amount of sweetness (could have even gone with less sugar), tangy yogurt, bursting with fresh berry flavor. I could have this for breakfast.

And I did. Thrice.


Strawberry Frozen Yogurt
inspired by 101 cookbooks

1 16oz container Greek-style yogurt
½ cup sugar (or to taste – though be aware the yogurt will taste sweeter prior to freezing)
½ teaspoon vanilla extract
1 cup fresh strawberries

1. Mix together the yogurt, sugar, and vanilla. Set aside, stirring occasionally, until the sugar has completely dissolved.

2. Transfer mixture to an ice cream maker and freeze according to the manufacturer's instructions.

3. Meanwhile, rinse strawberries, hull and cut into quarters.

4. Once the yogurt has reached the desired consistency, transfer to a bowl (or whatever container you plan on keeping the yogurt in) and quickly fold in the berries; place in the freezer.

*If using non-fat yogurt, this frozen treat will be solid once left in the freezer overnight. Remove it from the freezer at least 15 minutes before serving.

4.02.2008

Attack of the Artichoke Dip

Remember that "sour cream" I made not too long ago? Well, if you haven't been keeping up, I created some sort of dairy product that was supposed to be cheese (I think) but turned out to be the consistency of yogurt with the flavor of sour cream. I had attempted to bake with the stuff, but that was an experiment I will likely not revisit. (Actually, I still hope to make the original recipe some day, sans brazen substitutions, just to see how it should've come out.)


Now, what to do with the rest...

I had about a cup left over, and I really did not want to send it down, so to speak. During my previous efforts to find sweetened sour cream recipes, I came upon quite a few savory ideas. And the one what won me over? Artichoke dip. Who doesn't love artichoke dip? Or better yet, spinach artichoke dip. I would only need a few more ingredients: artichokes, spinach, Parmigiano cheese, and mayonnaise. A garlic clove might be nice, if I've got it laying around.


Well, I didn't follow a recipe per se. Rather, I tried to work from the memory of the slew of recipes I had read. It seemed pretty straightforward: prep ingredients, mix ingredients, bake ingredients.

I really didn't mean to make enough of this baked dip to outlast my desires for it, but I suppose that's what you get when you don't follow a recipe. But let me just tell you, before I went into a mild food coma after uncontrollable gorging (I like spinach artichoke dip)...wow! Creamy, cheesy, rich and bubbly, bursting with chunks (big chunks) of artichokes, and covered in crunchy gratineed cheese. Heaven. Seriously.


The following recipe is half of what I made originally. It's easy to double if you really do need more dip than you could ever possibly hope to eat on your own. When purchasing artichokes hearts, I prefer jars over the can; not to say there is anything wrong with canned artichokes. If you find that the quantities available by can or jar do not easily translate to what is listed below, do not fret, adding a bit more or less couldn't possibly hurt. This is the kind of recipe that lends itself very well to your own additions and subtractions.


Spinach Artichoke Dip

1 clove of garlic, roughly chopped
1 tbsp olive oil
1 bunch spinach, washed thoroughly and de-stemmed
1½ cups drained artichoke hearts, roughly chopped
½ cup sour cream
¼ cup mayonnaise
4 oz Parmigiano Reggiano, freshly grated (separate out 2 tbsp)
Kosher salt and fresh ground black pepper

Preheat the oven to 350°.

1. In a large pot over medium heat, sweat the garlic in olive oil. Add spinach, season with salt and wilt, 2-3 minutes. (Your goal is to cook the spinach as little as possible. Cover the pot initially to get it going, then “turn” the spinach in the pot, stirring the spinach at the bottom up to the top to expedite the process.) Remove spinach from the pot and spread out onto a cookie sheet or plate to cool.

2. In a medium bowl, combine artichokes, sour cream, mayonnaise, all but 2 tablespoons of the Parmigiano.

3. Once spinach had cooled, gather it up in your hands and squeeze out as much liquid as possible. Place the ball of spinach on a cutting board and cut ½” slices in one direction, turn the spinach 90° and cut ½” slices again. Break apart the chopped spinach into the bowl holding the artichoke mixture and mix well. Add salt and pepper to taste (if you need a measure, start with ½ tsp and ¼ tsp, respectively), tasting after each addition. Be conservative with the salt, the salty Parmigiano cheese contributes well to this dish.

4. Spoon the mixture into a shallow baking dish, approximately 9 X 9 or similar, and sprinkle top with remaining grated cheese. Cover loosely with foil and place on a middle rack in the oven. Bake for 15-20 minutes, or until hot and bubbly.

5. Remove foil and bake for another 10 minutes, or until the top has browned. For an extra crispy top, broil the mixture until golden brown (but watch closely to avoid burning). Serve immediately with crackers, bread or tortilla chips. Beware of overindulgence.

4.01.2008

Must We Call it Lactic?

Lactic cheese, there's just something about that name. It sounds so...technical, or biological, or something. I guess cheese is very much those things, but I prefer monikers of historical or geographical significance, graced with whimsy, even. But lactic? Must I? Well, I suppose...

But one thing this cheese does have going for it is simplicity. Heat milk to temperature, add culture and rennet, mix well, and leave it until tomorrow. Can't really get much easier.

For this trial, I misguidedly thought the room temperature was just that, which is what this cheese needed (72 degrees). As it has warmed up a bit, by San Francisco standards, the furnace was retired days ago and the cheese stood alone. And nearly 24 hours passed (12 longer than suggested by the recipe), and the milk had less than fully coagulated before I was informed of my error in judgement. Yes, the cheese spoke.

And not only that, it was less than generous with me. A gallon of whole milk yielded less than 1 pound (rather than the expected 2), which by volume came to just under two cups. This was my first attempt at such a cheese and had little idea what to expect. The result: pleasantly piquant (make that extremely, though still pleasant, like a very active-cultured yogurt) smooth and rich in the mouth, but not heavy. I suppose I could've allowed it to drain further, but I wanted a softer, creamier texture.
But I didn't know what to do with it. It didn't seem "ready." On it's own not altogether exciting, it needed something more than just the ole salt, pepper, and herb treatment. Then I remembered coming across a recipe for labneh, a Middle Eastern (Lebanese) yogurt cheese commonly served (or marinated) with olive oil, herbs, and spices.

Perfect. This lactic cheese was very much like the consistency of drained yogurt (or so I thought). Now, I would only need a jar-like accoutrement and some olive oil (I decided to marinate this one). Forgoing any seasoning at this step, I wanted to remain true to the cheese itself with only the additional flavor of olive oil; I began spooning up the soft cheese.

Um, yeah, this may not work. The gooey cheese barely fell off my spoon, and if it had, I largely imagined the eventuality of one big smear of cheese drenched in oil. (That might not be so bad, actually.) So I filled the bottom of my glass container with a generous pool of olive oil and scooped up dollops of cheese large enough for gravity to help me do the rest. Keeping each little gob separated by olive oil, I dropped the last bit into the dish.

I tucked the container into my cheese cave (i.e. my temperature-controlled dorm fridge) for the next 7 days, anxiously awaiting the next taste. I'm not sure where temperature played a roll here, as my "cave" is kept at approximately 10 degrees higher than your every day home fridge. I would have expected the flavor to develop even further, perhaps becoming more intensely sharp. Instead, the cheese had mellowed. It was tart at first, just as I had remembered, but it finished very softly. Still rich and creamy, and ever so slightly more coagulated. It did need salt, that's for sure, so with that I was generous. Fresh ground pepper, a rough chop of parsley, a fiery drizzle from a jar of oil-packed (hot!) little peppers, and now you're talkin'...

Sorry, I really shouldn't talk with my mouthful.

The following recipe is for yogurt (rather than lactic) cheese. You'll get similar results with much greater ease.

Yogurt Cheese in Olive Oil
inspired by 80 Breakfasts

1 quart plain yogurt (without stabilizers)
Kosher salt
Extra Virgin Olive Oil, at least one cup
Black peppercorns, dried chilies, herbs, garlic cloves, the choice is yours (and optional)

2 sq ft (more or less) fine cheesecloth or butter muslin
1 colander
1 bowl (to go under the colander)
1 Large Mason jar or glass or ceramic bowl for storage

1. Line a colander placed over a deep catch bowl with cheesecloth. Spoon half of the curd into the cheesecloth and add a sprinkle roughly ½ tsp of salt over the surface. Then add the remaining curds to the cheesecloth and another ½ tsp of salt.

2. Allow the yogurt to drain in the refrigerator for at least 6-12 hours (or longer, even), depending on the consistency you desire. Once the cheese has reached the desired texture, remove it from the cheesecloth and place in a clean bowl. At this point you may add any salt, pepper, herbs and spices to the cheese, otherwise they will be added to the oil in the next step.

3. In a large Mason jar, or similar container, pour a generous quantity (enough to coat the bottom with at least ¼ inch) of good quality olive oil (something you enjoy the flavor of). With a clean spoon, scoop up a dollop of cheese and drop into the oil. If you have a drier textured cheese, lightly roll the cheese into balls before dropping into the oil. Drizzle oil over each layer before adding more to the container to help keep the balls of cheese separated. If you are adding flavorings (herbs, spices, etc.) you may choose to do so between layers, otherwise, lay them in at the top when you have finished with the cheese.

4. Add olive oil to cover and seal the container airtight with its accompanying lid or plastic wrap.

5. Store in the refrigerator for at least 5 days to allow the flavors to meld.

6. To serve, spoon out some of the cheese and oil into a dish and garnish with salt, pepper, and herbs if desired. Spread on toast, crusty bread, or crackers, and enjoy! Remaining cheese (covered in olive oil) will keep in the fridge for weeks.

3.31.2008

No Ordinary Snack Cake

I'm not sure exactly what I made, and that is where it began. One gallon of milk and several packets of store-bought Yogourmet freeze-dried cheese starter later, I ended up with something that resembled yogurt in consistency but sour cream in flavor. I thought it was supposed to be cheese. Okay, so I didn't have it at the proper temperature during its developmental stages (a bit too cold). Yes, I know, I'm sure I didn't drain it enough; but I had already taken it away from the cheesecloth, and I simply didn't feel like putting it back. Well, that was silly.

In the ensuing willfulness, I found myself scouring the web for some sort of recipe requiring substantial quantities of sour cream (I decided that's what I had, and I had nearly 1 quart of it). Initially sour cream pound cake seemed like a natural choice, but I didn't have a loaf pan and dammit, I wasn't going to buy one (though I plan to within the next few days). What about cookies? That might be interesting, I don't think I've ever made cookies with sour cream.

Along the way I found a recipe for lemon mousse containing either yogurt or sour cream as one of the main ingredients. Hmm...before I had decided I had sour cream, I thought I might have had yogurt, so there we go. Next, I stumbled upon this delightful sour cream cake jammed full (in the best way) of lime curd. The sparks flew. Sour cream cupcakes filled with a lime curd-mousse combo and topped off with...I can't decide...sour cream icing? Would the lime mousse alone do? Bare naked, perhaps? I know...twinkies!
I was gifted a twinkie pan (actually a twinkie kit) sometime ago, and this was the perfect opportunity to use it. Little did I know that I was getting myself into something much bigger than a mere salute to the impregnable little snack cakes.

While I am positive that this recipe would have worked for me had I not made extraneous substitutions (my so-called-sour-cream instead of the real thing paired with a mini-mini loaf versus the prescribed 9X9 pan), these cakes resembled little rubber door stops. Oh goodness, there I go with these substitutions. This is the cook part of me that clashes horribly with the wannabe baker in me - you can't just do what you want in baking, there are recipes and chemistry involved, it's the melding of art and science. This lesson I'm not sure I'll ever learn.

So the mousse recipe, in my limited experience in mousse, seemed wrong in so many ways, but I was willing to give it the benefit of the doubt; obviously it's worked for someone before. Now, here is where I should have just let my own judgment take over (nevermind the fact that I was once again making a substitution), but alas, I ended up with lime soup. It was tasty soup, but certainly not the beginnings of a cake filling by any stretch of the imagination. "I'll add gelatin," I thought. I was conservative with this one. (Nothing quite as unpleasant as too much gelatin in anything, really.) Oh, not enough. I'll add more. What the..?

I added twice what I had before. What happened to conservative? What am I doing? Making lime sealant, apparently - could've bounced a quarter off this mess. Hmmm...okay: warm it up (make it fluid again), whip some of the cream I have left, fold a small amount of the lime putty back in...and voila! Lime whipped cream mousse filling! This final incarnation was admittedly quite good, but the 1+ day of trail and error became comedic and downright annoying, though through it all, I refused to give up.
Meanwhile, I opted for sponge cakes courtesy of the recipe in the little booklet that came in the kit, as I was certain that my "sour cream" calamities were unstuffable. Amazing. They looked amazing. Proud mama I was, they looked just like the real thing. So why can't they be filled? Indeed, those atomic yellow submarines truly are cream filled air cakes, there would be no other explanation for how they can get that whipped sugary substance inside those things. Yes, I was forced to create the illusion of cream-filled goodness for the aesthetics of this piece.

Put your hands in the air, and back away from the twinkie.

Next time, I'll just let the cheese drain longer.

3.17.2008

Cheese Scones and Great Expectations

I just happened to come across this cheese from Neal's Yard Dairy called Coolea (coo-lay). An Irish cheese from and English dairy? Interesting; I must taste. (As it turns out, Neal's Yard Dairy became the market when the business grew out of its britches and now the Creamery is the cheesemaking entity.) Upon purchase I intended to add it to some cheesy potato creation I had been dreaming up, but upon tasting I realized it was far too unique to share the stage with any other cheese.

Firm but densely creamy texture, this cheese was similar in ways to Gouda, but still in its own class. Striking butterscotch flavor; if you've ever tasted a cheese and thought, "They say 'butterscotch,' what do they mean, 'butterscotch,' this is cheese, not dessert," then you haven't tasted this one. Sweet caramelized dairy, it was amazing! The quietest grassy herbal notes mingled in with the finish, oh! Words can not explain. I prefer grunts.

In later conversations with myself, I debated the pros and cons of cooking and/or baking with such a fine cheese. "Would they cast me away forever?" I wondered of the countless cheese lovers who would consider the thought of doing something to such an awesome cheese sacrilege. But throwing all judgments and paranoia to the wind, I decided to make scones, soft and tender and riddled with broken nuggets of my new found gem.

Using the same recipe as for the failed cream cheese that turned into a delicious cultured butter, I had only to make a few random substitutions for lack of required ingredients. No AP flour, so in goes bread flour with a touch of oat flour to tone down that gluten. And then there was the buttermilk; it continued to do things in its container, so it was, how should I say so as not to offend, gloopy. I used it anyway. (I must say I've gotten much more adventurous with my dairy products.) In the end, the substitutions created negligible differences. The dough was stiffer than before, probably due to the buttermilk, but the results were just as soft and tender as my first attempt. Then there was the cheese.

Cheese purists of the world, forgive my misdeeds. While the cheese melded into the scone just as I had hoped, it became bitter and chewy. Robust flavors of butterscotch, no more. Delicate sweetness and notes of green pasture, gone. I had killed the cheese.

A bit melodramatic, perhaps. But I can tell you that doing something with this cheese did nothing for it. I was disappointed; I expected a better than expected experience. And while I am certain that I will attempt cheesy scones again, I am also certain that I will be saving dairy of this caliber only for my lonely gullet.

3.16.2008

Part of an Addiction

I can't imagine much better than something draped in cheese sauce. Probably my greatest weakness (besides homemade mashed potatoes) is something draped in cheese sauce. That something, more specifically, is any part of a starchy family I love so dearly: pasta, rice, and potatoes. At any given moment, I usually have all the makings of a cheese sauce on hand (butter, flour, milk, and cheese), and the starch to boot (potatoes being an exception). Combine these ingredients with a moment of weakness, and you've got some cheesy goodness.

Here I am somewhat of a purist when it comes to these ingredients. I'd like to turn them into a meal, really I would, something that may have nutritional value even. But I rarely enjoy any of those dishes as much as I do their unadulterated versions. I'm talkin' macaroni and cheese, potato gratin, parmesan risotto; from elegant to humble I like mine unfettered by chunks and bits and crumbs. That single texture married with it's velvety counterpart; each ingredient coming through while coming together. Elementary enjoyment.

And then somehow Tater Tots crept into my train of thought. I can't even remember the last time I enjoyed Tater Tots. Little chunks of potato in a crispy jacket with just the right amount of salt sprinkled atop, and they're history. Their texture so perfect: beyond the crispy crunch, each bitty hunk of potato holding its integrity and all the while so, so tender. Next thing you know, I'm searching my brain for any recollection of a potato gratin made with cubed potatoes. Not to imply that I'm the first and/or the only, but really I don't know that I've seen such a thing.

Oh, what has been missed. So lovely, a perfect form of potato swathed in cheese. I chose a waxy potato so each little cube would hold its texture and decided to parcook them in salted water beforehand. Now for the cheese sauce. I am from the school of the bechamel-based sauce, though not literally, that's just what I do. Recently, I read an article in the New York Times (that was not recent, yeah try 2 years old, but new to me), concerning the great debate of cheese sauce. Well not really, but to paraphrase, the author dissed the white sauce base right off the bat. I've always been curious just how cheesy anything can be without the saucy base to get it started. And while I am fully willing to experiment, and plan to (soon, actually), I wasn't ready at this moment.
So I decided to compromise. I made a standard bechamel, instead using much less and to it adding nearly double the amount of cheese I normally would have (for that amount of base), just to see. Alone it was quite cheesy and far less creamy, that is, the mouthfeel was much closer to melted chese than it was to sauce. Baked together with tender nuggets of potato, it very much became what I had expected; the potatoes soaked up what they could and left morsels of melty cheese throughout. And while it was delicious, rich, and decadent, I did miss the creamy sauce, just a bit.


The following recipe would work well for 2½ pounds (give or take) of peeled, medium-diced potatoes, parcooked. Simply mix the potatoes together with the sauce, spoon into a shallow baking dish and bake uncovered in a 350 degree oven until desired bubbling and browning has occurred (30 minutes or so).

This is a creamier sauce. For something cheesier in texture, remove about half of the white sauce from the pan before adding the cheese. You can always add more sauce back into the mix to adjust the texture to your desire. This will, of course, yield less sauce.


Basic Cheese Sauce

2 tbsp unsalted butter
2 tbsp AP flour
1 – 1½ cups whole milk (2% or skim would work also)
1 lb grated cheese such as sharp cheddar, gruyère, gouda, or other favorites
Kosher salt and freshly ground white or black pepper to taste
2 drops each of Tabasco and Worcestershire (optional)
¼ tsp ground yellow mustard (optional)

1. Melt butter in a medium sauté pan (the curved sides of the pan will work better with a whisk); add flour and whisk together. The butter-flour mixture (roux) should be moist with a glossy sheen (add more butter if the mixture looks clumpy and crumbly, but be conservative; a little goes a long way).

2. Lower the heat to maintain light bubbling. Cook the roux to a light golden color, stirring frequently to prevent scorching.

3. Whisk 1 cup of milk (not ice cold) into the roux. The mixture will appear very thin at first, but will reach its full thickness just before coming to a boil. If the mixture is too thick for your taste, add more milk. Remember, allow the sauce to come nearly to a boil before each addition of milk to be sure you don’t end up with a sauce that’s too thin.

4. Cook the sauce over medium heat, stirring often, for at least 10-15 minutes to cook away that raw flour taste. Resist any urges to season the sauce at this point (wait until the cheese is in).

5. Stir in grated cheese. Add salt and pepper to taste and additional flavorings as desired. Applications are unlimited.